
Advertisements
Ratings
“What is WordPress Plugin?
How to install WordPress Plugin?
The article below has answers to all your questions.
Please read this article carefully.”

wordpress-plugin-install
Install WordPress Plugin – If you use WordPress on your website then this article can be useful for you. Today we are going to tell you how you can install WordPress Plugin(s) in your WordPress website.
If you want to add a new feature in WordPress, then according to your requirement, you have to install a Plugin from WordPress Plugin Directory and a new feature gets added to your website.
Installing or adding Plugin in WordPress is a very easy task, for this you do not need to hire any developer, you can do this work yourself without knowing any coding.
You just have to follow some simple steps and your Plugin will be added to your WordPress website.
- 10 Best Dark WordPress Themes 2023
- 10 Best Budget Friendly Laptops for Bloggers with Impressive Performance
- Tier 1, Tier 2 and Tier 3 Countries vs Google AdSense Earning: Analyzing the Disparities
- RARBG Proxy Sites 2023: Unblock [Reliable Mirror & Proxies]
- 1000 Visitors v/s Google AdSense Earning (September 2023)
- VPS Hosting for Beginners: User-Friendly Providers
- Automate Your Blog: Streamlining Efficiency and Elevating Impact
- 10 Best Coaching WordPress Themes 2023
- 5 Best WordPress Hosting Provider in Puerto Rico 2023
- 5 Best WordPress Hosting Provider in Bahamas 2023
Contents
- 1. Step-by-Step Guide to Installing WordPress Plugins: A Beginner’s Tutorial
- 2. Top 10 Must-Have WordPress Plugins for Your Website
- 3. How to Install WordPress Plugins without FTP Access
- 4. Using WordPress Plugin Repositories: A Guide to Finding the Right Plugin
- 5. Installing Free vs. Premium WordPress Plugins: Pros and Cons
- 6. The Best WordPress SEO Plugins to Boost Your Website’s Search Rankings
- 7. How to Install WordPress Contact Form Plugins for Better Lead Generation
- 8. The Importance of Updating Your WordPress Plugins and How to Do It Safely
- Conclusion
- Install WordPress Plugin FAQs
1. Step-by-Step Guide to Installing WordPress Plugins: A Beginner’s Tutorial
Sure, here’s a step-by-step guide to installing WordPress plugins for beginners:
- Log in to your WordPress dashboard. You can access this by adding “/wp-admin” to the end of your website URL and entering your login details.
- From the left-hand menu, select “Plugins” and then click “Add New”.
- You can either search for a plugin by typing in a keyword or upload a plugin file that you have downloaded.
- To install a plugin from the WordPress repository, simply click the “Install Now” button next to the plugin you want.
- Once the plugin is installed, you will see a button that says “Activate”. Click this to activate the plugin.
- Some plugins may require additional configuration or setup. Look for a new menu item or submenu item in your WordPress dashboard and follow the plugin’s instructions.
- If you want to install a plugin that you have downloaded, click “Upload Plugin” on the “Add Plugins” screen, select the file from your computer and click “Install Now”.
- Once the plugin is installed, click the “Activate Plugin” link.
- Once activated, you can find your new plugin in the left-hand menu or on the WordPress dashboard.
- To deactivate or delete a plugin, go to the “Plugins” screen in your WordPress dashboard and click the “Deactivate” or “Delete” link next to the plugin you want to remove.
That’s it! You now know how to install WordPress plugins.
There are 3 ways to install Plugin in WordPress website. We have explained all these methods with pictures below.
From the first method to the last method, the methods of installing WordPress plugin will become difficult from easy.
Method 1: Installing Plugins from the WordPress Dashboard
This method is the easiest way to install Plugin in WordPress website which generally all WordPress website users use.
1. Go to the Plugins tab in the left sidebar on the WordPress Dashboard.
2. Then click on “Add New” tab.
3. Then search the Plugin with the help of “Search Box”.
4. Then install the Plugin by clicking on the “Install Now” button.
5. Then activate the Plugin by clicking on the “Activate” button.
In this way your plugin will be installed on your WordPress website.
Go To : Plugins > Add New > search Plugins > Install Now > Activate
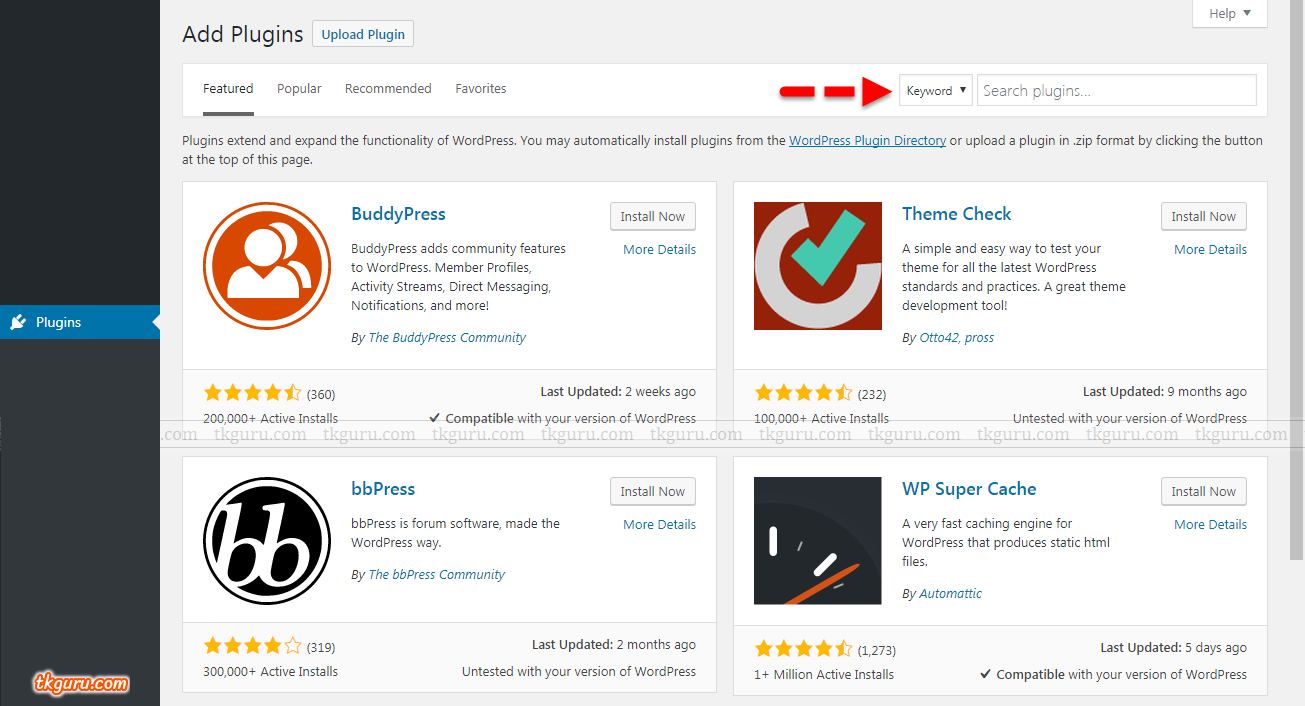
Image 1: WordPress Plugins Installation Technique
Method 2: Downloading and installing WordPress Plugins
This method is a bit harder than the previous method of installing Plugin in WordPress website which is generally used to install paid plugins.
Generally this technique is not used to install free plugins from WordPress Plugin Directory because this method is a bit lengthy and difficult.
1. First download the WordPress Plugin.
2. Now go to the Plugins tab in the left sidebar on the WordPress Dashboard.
3. Then click on “Add New” tab.
4. Then click on “Upload Plugin” tab.
5. Then upload the downloaded Plugin with the help of “Choose file”.
6. Then install the Plugin by clicking on the “Install Now” button.
7. Then activate the Plugin by clicking on the “Activate” button.
In this way your plugin will be installed on your WordPress website.
Note: The file format of the plugin to be uploaded should be .zip only.
Go To : Plugins > Add New > Upload Plugin > Choose file > Plugin select > Install Now > Activate
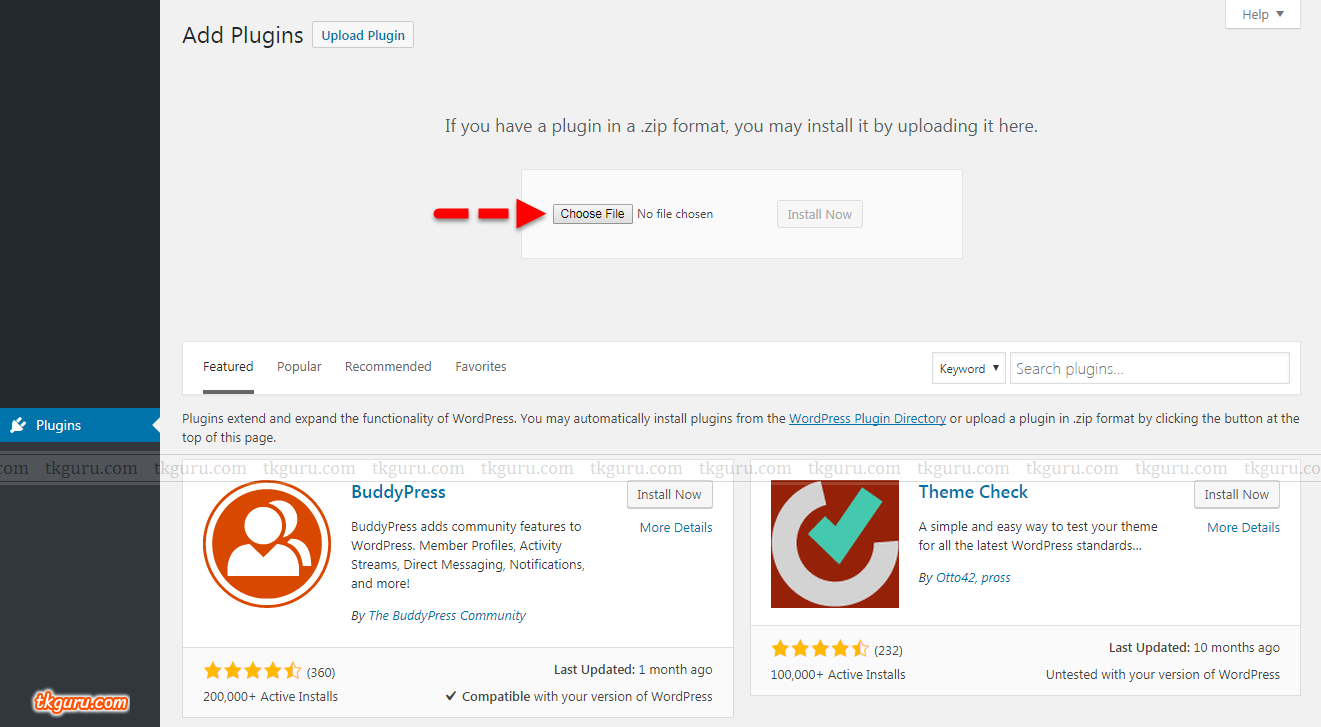
Image 2: WordPress Plugins Installation Technique
Method 3: Installing WordPress Plugins from cPanel
This method is the most difficult way to install Plugin in WordPress website. If you use this method for the first time, then follow all the steps given below carefully.
To install the plugin in this way, you must have cPanel hosting. In whose file manager you can see all the files of your WordPress website.
1. First download the WordPress Plugin.
2. Now open “cPanel” in server side.
3. Then open “File Manager”.
4. Then open “Public_html”.
5. Then open “wp-content”.
6. Then open “Plugins Folder”.
7. Then upload the downloaded Plugin with the help of “Upload”.
8. Then do “Plugins Extract”.
In this way your plugin will be installed on your WordPress website.
Note: All the files and folders available in the File Manager are important for the WordPress website, so do not make unnecessary changes to any files and folders.
Go To : cPanel > File Manager > Public_html > wp-content > Plugins > Plugin Select > Upload > Extract
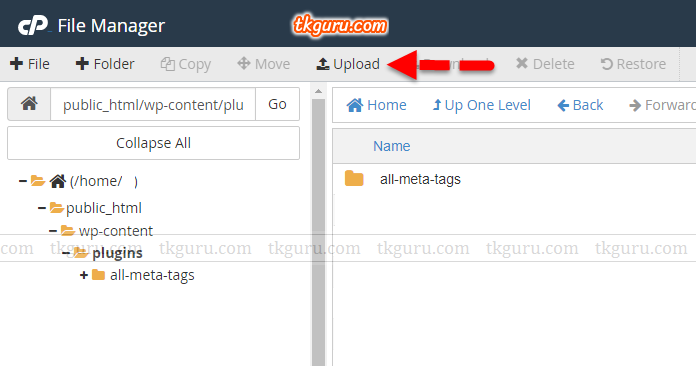
Image 3: WordPress Plugins Installation Technique
Common Errors to Avoid When Installing WordPress Plugins
Some common errors to avoid when installing WordPress plugins are:
- Installing too many plugins: Installing too many plugins can slow down your website, and some plugins may conflict with each other.
- Installing plugins from untrusted sources: Only install plugins from trusted sources such as the WordPress plugin repository or reputable developers.
- Not updating plugins: Failure to update plugins can result in security vulnerabilities, bugs, and compatibility issues.
- Incompatible plugins: Check if the plugin is compatible with your version of WordPress before installation.
- Installing plugins that duplicate functionality: Installing plugins that duplicate functionality can lead to conflicts and slow down your website.
- Not deactivating conflicting plugins: If you experience conflicts between plugins, deactivate the conflicting plugin and find a suitable alternative.
- Poorly coded plugins: Avoid poorly coded plugins that can cause performance issues, security vulnerabilities, and bugs.
- Ignoring user reviews and ratings: User reviews and ratings can provide valuable insights into a plugin’s performance, reliability, and support.
- Ignoring plugin compatibility with your theme: Check if the plugin is compatible with your theme before installation.
- Failing to configure the plugin properly: Ensure that you configure the plugin correctly and follow the setup instructions provided by the developer.
2. Top 10 Must-Have WordPress Plugins for Your Website
- Yoast SEO: Helps optimize your website for search engines.
- Jetpack: Provides a variety of features, including site stats, security, and backup services.
- WPForms: A drag-and-drop form builder for creating contact forms, surveys, and more.
- W3 Total Cache: Improves website speed and performance by caching website pages and optimizing website files.
- Akismet Anti-Spam: Blocks spam comments and form submissions.
- UpdraftPlus: A backup and restore plugin for safeguarding your website data.
- Smush: Compresses and optimizes images to improve website load times.
- Elementor: A page builder plugin for creating custom website pages and layouts.
- WooCommerce: A plugin for creating and managing an online store.
- Contact Form 7: A simple and flexible contact form plugin for adding forms to your website.
3. How to Install WordPress Plugins without FTP Access
You can install WordPress plugins without FTP access by following these steps:
- Log in to your WordPress dashboard and go to the “Plugins” section.
- Click on the “Add New” button at the top of the page.
- In the search bar, type the name of the plugin you want to install and hit enter.
- When the plugin appears, click on the “Install Now” button next to it.
- Once the installation is complete, click on the “Activate” button to activate the plugin.
If you don’t have FTP access, this method is the easiest and most straightforward way to install WordPress plugins. However, if you encounter any errors, it’s always a good idea to contact your hosting provider or the plugin developer for assistance.
4. Using WordPress Plugin Repositories: A Guide to Finding the Right Plugin
WordPress Plugin Repositories are directories of WordPress plugins where users can browse, download, and install free and open-source plugins. Here’s a guide to finding the right plugin in the WordPress Plugin Repositories:
- Go to the WordPress Plugin Directory: The WordPress Plugin Directory is the official repository of WordPress plugins. You can access it by going to the WordPress website and clicking on the “Plugins” tab.
- Search for a Plugin: You can search for a plugin by typing in a keyword or phrase related to the plugin you’re looking for in the search bar located at the top right corner of the page.
- Browse the Plugin Directory: If you’re not sure what plugin you’re looking for, you can browse the plugin directory by clicking on the “Popular” or “Featured” tabs. You can also sort plugins by category, rating, and download count.
- Read Reviews and Ratings: Before installing a plugin, make sure to read the reviews and ratings left by other users. This will give you an idea of how well the plugin works and whether it’s worth installing.
- Check Compatibility: Make sure to check the plugin’s compatibility with your version of WordPress before installing it. Plugins that are not compatible with your version of WordPress can cause errors and compatibility issues.
- Install the Plugin: Once you’ve found the right plugin, click on the “Install Now” button. WordPress will automatically download and install the plugin for you.
- Activate the Plugin: After installing the plugin, you’ll need to activate it to start using it. Go to the “Plugins” page in your WordPress dashboard, find the plugin you just installed, and click on the “Activate” button.
- Configure the Plugin: Most plugins require some configuration before they can be used. Follow the plugin’s instructions to configure it and start using it on your website.
By following these steps, you can easily find and install the right WordPress plugin for your website.
5. Installing Free vs. Premium WordPress Plugins: Pros and Cons
Installing Free vs. Premium WordPress Plugins: Pros and Cons
Free and premium plugins are both available in the WordPress plugin repository, and each has its own advantages and disadvantages. Here are some pros and cons of installing free vs. premium WordPress plugins:
Free Plugins:
Pros:
- They are free of cost, which makes them an attractive option for many users.
- They are usually easy to install and use.
- They are available through the WordPress plugin repository, which is accessible from within your WordPress dashboard.
- They often have a large user base, which means they are regularly updated and maintained.
- They are a great option for basic website functionalities.
Cons:
- Limited functionality compared to paid plugins.
- They may not have extensive support or documentation.
- They may be prone to security vulnerabilities or compatibility issues.
Premium Plugins:
Pros:
- They offer advanced features and functionalities, often not available in free plugins.
- They offer extensive support and documentation.
- They come with regular updates and maintenance, ensuring compatibility with new versions of WordPress.
- They are usually more secure than free plugins.
Cons:
- They can be expensive, which may not be affordable for all users.
- They require a separate purchase and download process, which can be more complex than free plugins.
- They may have a steeper learning curve than free plugins.
In conclusion, the choice between free and premium WordPress plugins ultimately depends on your needs and budget.
While free plugins are great for basic website functionalities, premium plugins can provide advanced features and functionalities with better support and security.
6. The Best WordPress SEO Plugins to Boost Your Website’s Search Rankings
- Yoast SEO
- All in One SEO Pack
- The SEO Framework
- Rank Math
- SEOPress
- WP Meta SEO
- SmartCrawl SEO
- Premium SEO Pack
- Jetpack
- Broken Link Checker
These are the top 10 best WordPress SEO plugins to boost your website’s search rankings.
7. How to Install WordPress Contact Form Plugins for Better Lead Generation
Installing WordPress contact form plugins is a simple process. Here is a step-by-step guide to help you get started:
- Log in to your WordPress dashboard.
- Go to the “Plugins” section and click on “Add New.”
- In the search bar, type in the name of the contact form plugin you want to install.
- Once you find the plugin, click on “Install Now.”
- After installation, click on “Activate.”
- Now, go to the “Contact” section on your dashboard and select “Add New.”
- Customize your form as per your requirement.
- Once done, save your contact form by clicking on “Save.”
- Copy the shortcode that appears on the page.
- Paste the shortcode in the “Contact Us” page of your website.
Some of the popular WordPress contact form plugins are WPForms, Gravity Forms, Contact Form 7, Ninja Forms, etc. You can choose the plugin that best suits your needs and preferences.
8. The Importance of Updating Your WordPress Plugins and How to Do It Safely
Updating your WordPress plugins is crucial for maintaining the security and performance of your website. Here are some reasons why updating is important and tips on how to do it safely:
- Security: Updates often contain security patches that fix vulnerabilities that could be exploited by hackers.
- Bug fixes: Updates may also include bug fixes that can improve the functionality of your website and fix any issues.
- Compatibility: Plugin updates can also ensure that they remain compatible with the latest version of WordPress, preventing any conflicts or issues.
To update your WordPress plugins safely, follow these tips:
- Backup your website: Before updating your plugins, it’s important to back up your website to avoid any potential loss of data.
- Read the changelog: Always read the changelog to see what changes the update includes and if there are any known issues.
- Test the update: Test the update on a staging site or in a local environment to make sure it doesn’t break any of your website’s functionality.
- Update one at a time: Update plugins one at a time to avoid conflicts or issues.
- Monitor your website: After updating, monitor your website for any issues or conflicts that may arise.
By following these tips, you can ensure that your WordPress plugins are up to date and your website remains secure and functional.
Conclusion
If you want to create a website and are thinking of creating a website on WordPress platform, then you should improve the functions of your website by using thousands of Free Plugins available in WordPress directory.
We hope that you have learned all the techniques of installing Plugins through this article.
Install WordPress Plugin FAQs
WordPress plugin is a software component that adds new functionality to a WordPress website. Plugins can be installed and activated from the WordPress dashboard, and they can be customized to match the needs of the website owner.
To install a WordPress plugin, go to the WordPress dashboard and click on 'Plugins' and then 'Add New'. From there, you can either search for a plugin or upload a plugin from your computer. Once you find a plugin you like, click the 'Install Now' button, and then click 'Activate' to make it active on your website.
Yes, you can install a plugin that you downloaded from a third-party website by going to the WordPress dashboard and clicking on 'Plugins' and then 'Add New'. From there, click on the 'Upload Plugin' button and select the plugin file from your computer.
When selecting a WordPress plugin, you should consider factors such as its functionality, compatibility with your theme and other plugins, user ratings and reviews, and whether it is regularly updated and supported by the developer.
Most WordPress plugins can be customized to some extent, depending on the options provided by the plugin developer. Some plugins may also allow you to customize the code or add custom CSS to modify their appearance or functionality. However, it's important to note that making changes to a plugin's code can cause issues with compatibility or security, so it's recommended to only make changes if you have the necessary technical skills and experience. What is a WordPress plugin?
How do I install a WordPress plugin?
Can I install a plugin that I downloaded from a third-party website?
What should I look for in a WordPress plugin?
Can I customize a WordPress plugin?
| Web Hosting | Website |
| WordPress | Google Adsense |
| SEO | Affiliate Marketing |
| Blogging | YouTube |
Recent Posts
- 10 Best Recruitment WordPress Themes 2023
- 10 Best Insurance WordPress Themes 2024
- 10 Best Loan WordPress Themes 2024
- 10 Best Classified Ads WordPress Themes 2023
Related Tags
how to install plugin in wordpress free, add new plugin wordpress missing, how to add a plugin to wordpress page, how to install plugins in wordpress without business plan, wordpress install plugin programmatically, install plugin chrome, wordpress plugins, how to install plugins minecraft


