
Advertisements
Ratings
 “How to Register Domain Name?
How can we register Domain Name from Hostgator?
The article below has answers to all your questions.
Please read this article carefully.”
How to Register Domain Name? । Hostgator (2023) – आप जब भी किसी website को Google, Yahoo, Bing या किसी भी search engine मे search करते हो तो उस website का domain name आप search bar मे डालते हो और वह website आपके सामने search हो कर आ जाती है । Domain name एक website की identity होती है जिस की मदद से आप website को internet पर search कर पाते हो ।
Domain Name registration step by step – Hostgator
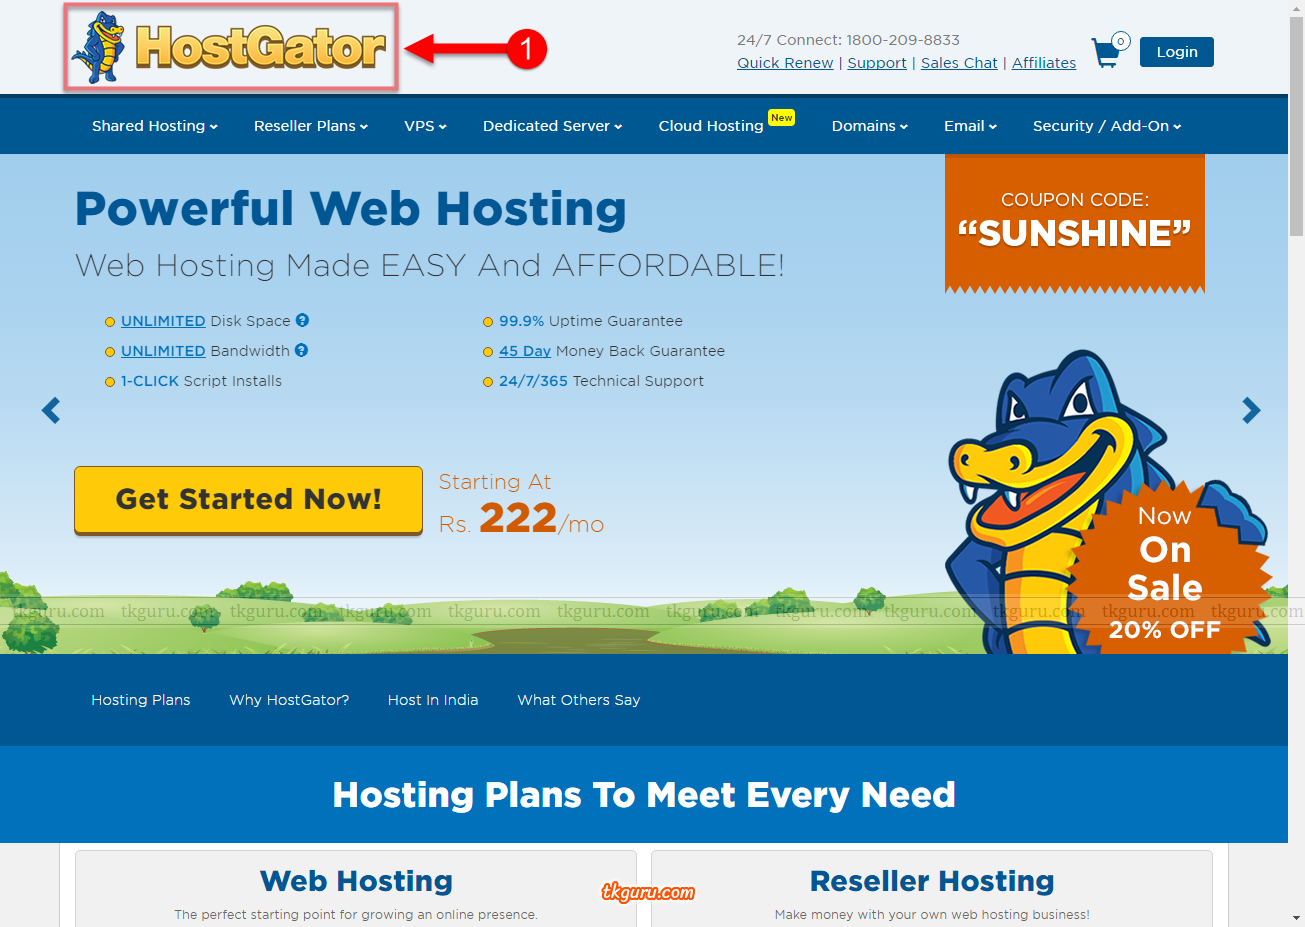
Step 1 : आपको एक domain name register करने के लिए सबसे पहले Hostgator की official website पर visit करना है ।
यहाँ click करें : Hostgator
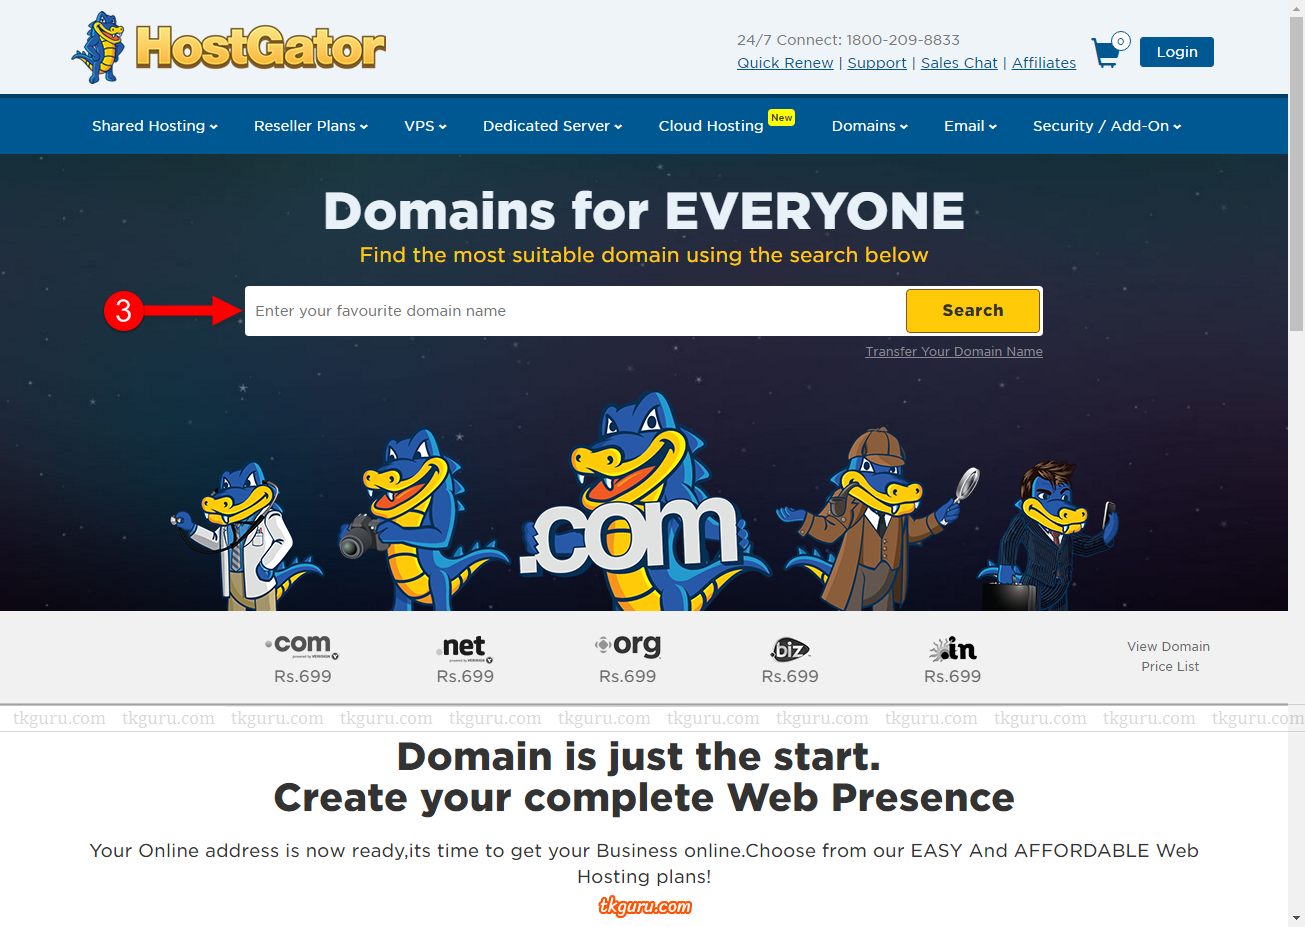
Step 2 : अब सबसे ऊपर जहाँ menu bar में “Domains” लिखा है उस पर click करें । अब एक sub-menu open होगी । इस sub-menu में “Register Domain” पर click करें ।

Step 3 : आपने जो भी domain name अपनी website के लिए सोचा है उसे domain extension (जैसे .com, .net, .org) के साथ “Enter your favorite domain name” की जगह search box मे लिख कर “Search” button पर click कर दें ।
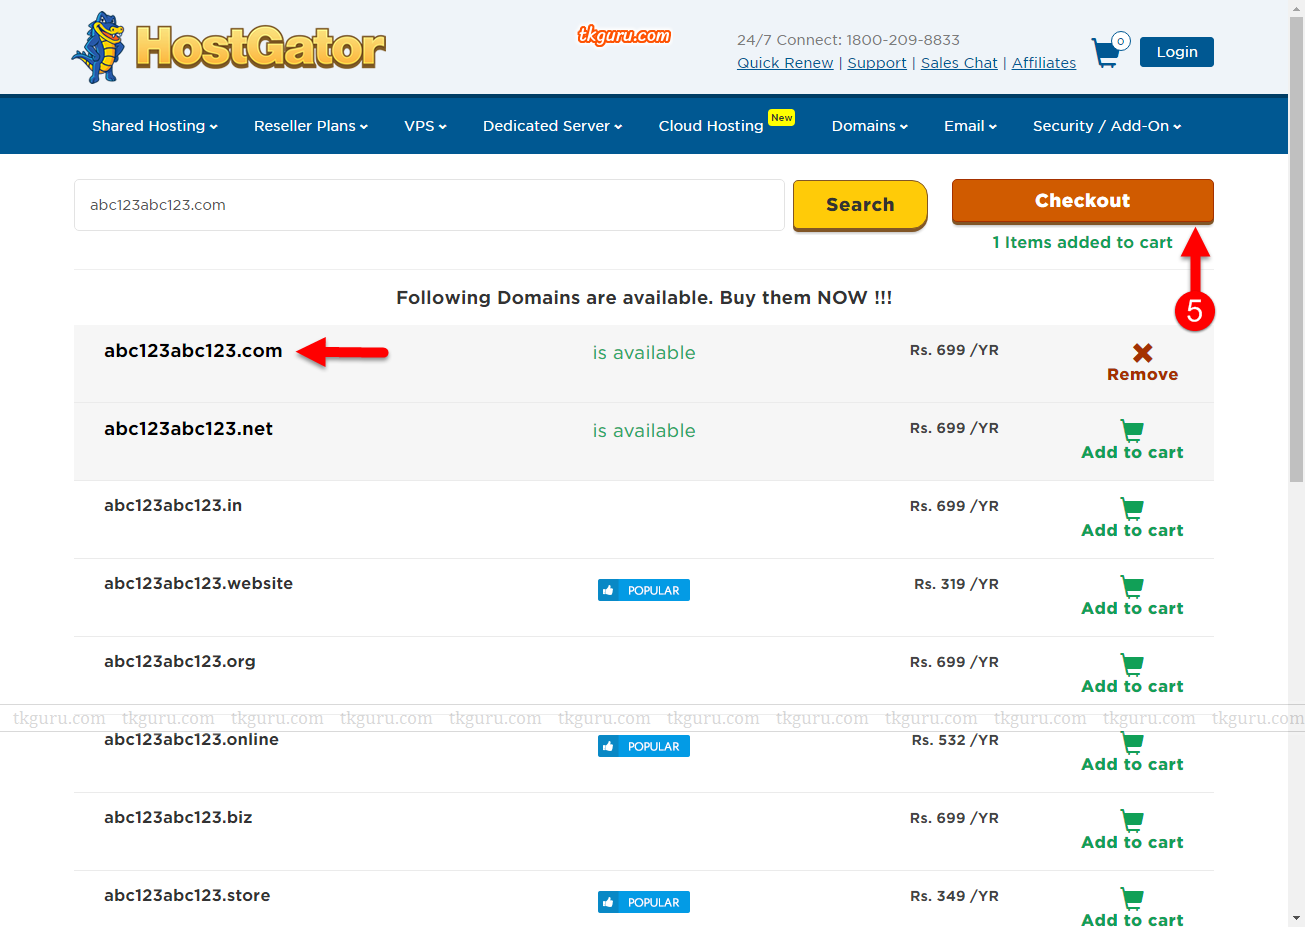
Step 4 : आप जब search button पर click करते हैं तो domain names एक list form में आपको एक साथ दिख जाएंगे । अगर आपने जो भी domain name अपनी website के लिए सोचा है वह available है तो आप “Add to Cart” पर click कीजिये और अगर आपने जो भी domain name अपनी website के लिए सोचा है वह available नहीं है तो आपके पास यहाँ दो option होते हैं :
(1) दूसरा domain name search कीजिये ।
(1) दूसरा domain extension search कीजिये ।
जैसे अगर आपने abc123abc123.com domain search किया और यह domain available है तो आप इसे खरीद सकते हैं लेकिन अगर यह domain .com domain extension के साथ available नहीं है तो आप abc123abc123.in या abc123abc123.net भी ले सकते हैं ।

Step 5 : आप जैसे ही “Add to Cart” पर click करते है website के लिए जो नाम आपने सोचा है वह आपके लिए Hostgater द्वारा book कर दिया जाता है । अब आपको इसे खरीदने के लिए “Checkout” पर click करना होगा ।
Step 6 : आप जैसे ही “Checkout” पर click करते हैं आप “Order summery” page पर पहुँच जाते हैं । यहाँ आपको 4 चीजें देखनी है :
(1) Domain Name जो आपने अपनी website के लिए choose किया था वही आपने select किया है या नहीं । (यहाँ आप को mainly typing mistake check करनी होती है ।)
(2) आप अपनी website के Domain Name के साथ privacy protect लेना चाहते हैं या नहीं ।
(3) आप अपनी website का Domain Name कितने duration के लिए resister करना चाहते हो । (यहाँ आप 1 से लेकर 10 साल तक के लिए domain name registration एक साथ करा सकते हो । )
(4) कोई coupon code अगर available है या नहीं । अगर है तो उसे use करें आप को 10-40% तक का discount मिल सकता है । (coupon code hostgator के home page पर दिया होता है । )
इन सभी 4 चीजों को अपनी requirement के according choose करने के बाद आपको “Continue” button पर click करना है ।
Website privacy protect क्या है ?
Website privacy protect आपकी identity की चोरी, spammers और telemarketers से आपको सुरक्षित रखती है । आपके Domain Name के लिए privacy protect के बिना, आपकी contact information किसी भी व्यक्ति के लिए public और visible होती है जो आपके Domain Name पर WHOIS जाँच करके पा सकता है ।
Privacy protection यह ensure करता है कि आपकी domain name से associated contact information publicly visible नहीं रहेगी । यह alternate contact information के साथ आपके सभी publicly visible contact information को बदल देता है ।

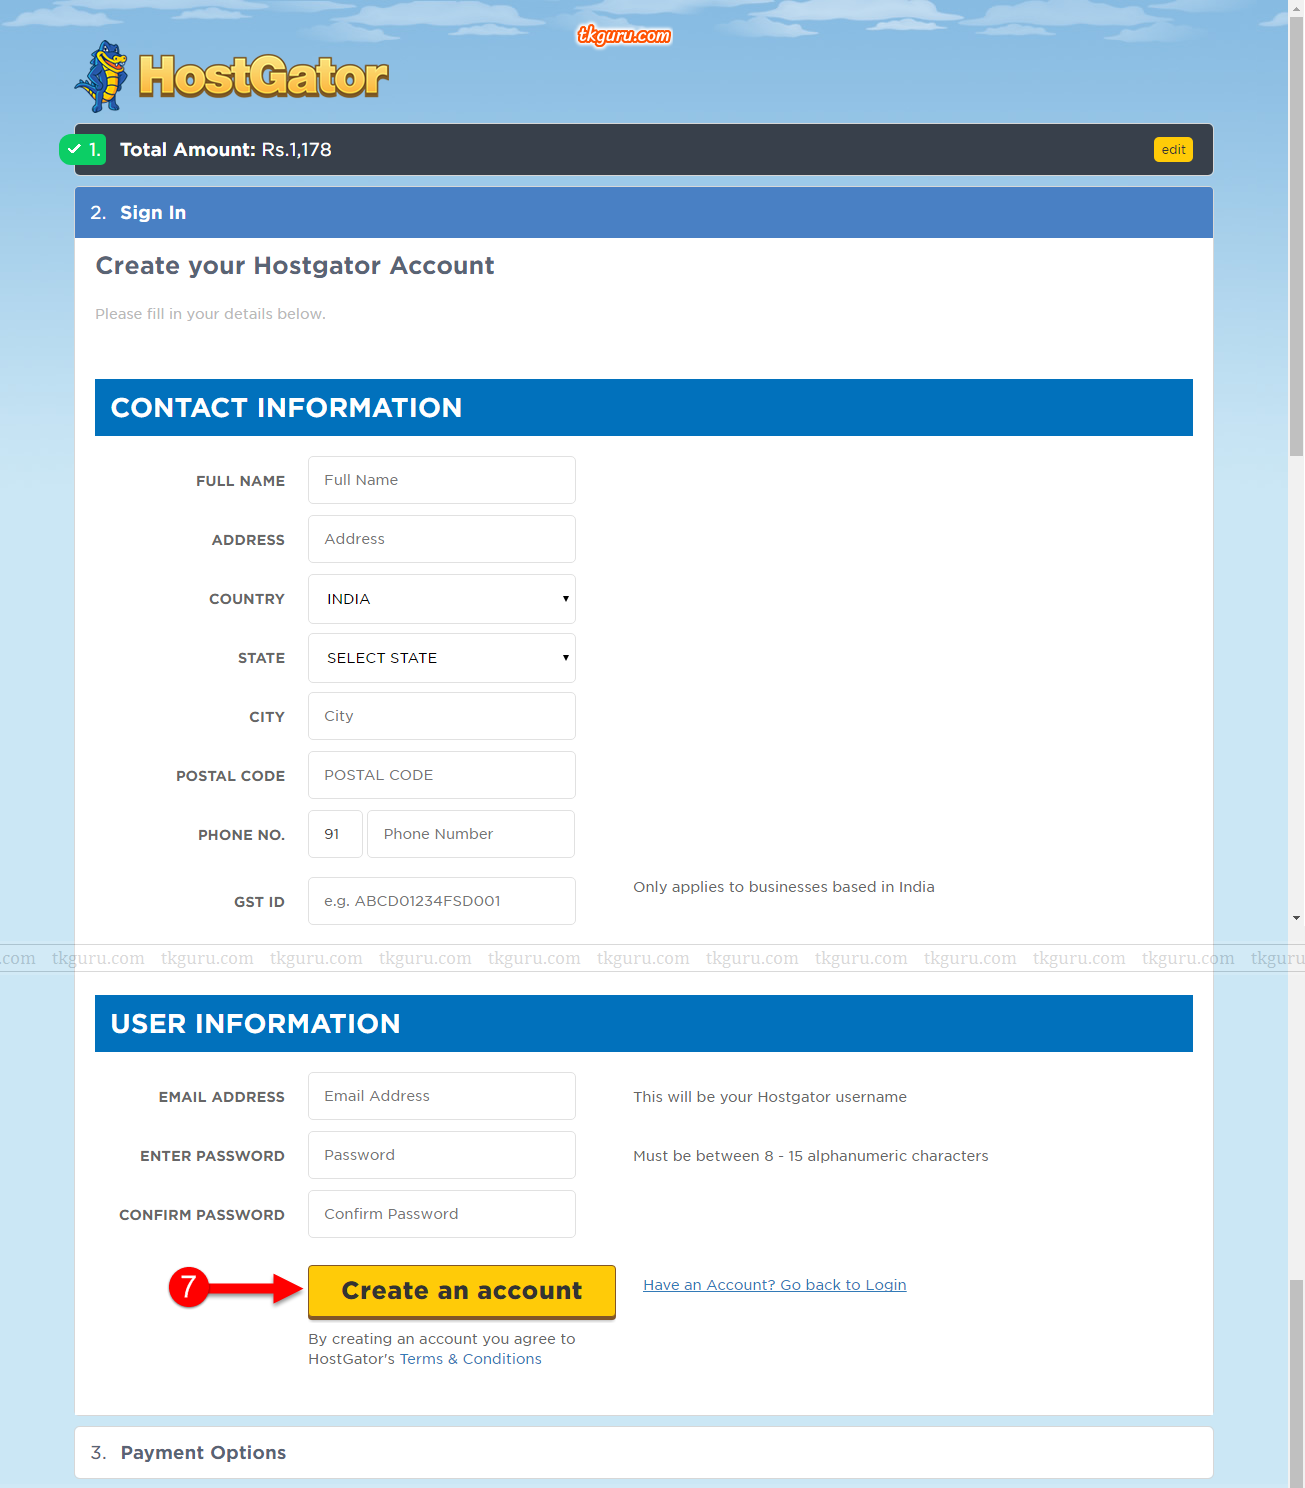
Step 7 : आप जैसे ही “Continue” पर click करते हैं आप “Sign In” page पर पहुँच जाते हैं । अगर आप Hostgator पर पहले से ही register हैं तो यहाँ आपको “Log In” करना होगा नहीं तो आपको “Create an account” पर click करना होगा।

आप जैसे ही “Create an account” पर click करते हैं आप एक page पर पहुँच जाते हैं जहाँ पर आपको आपकी दो तरह की information add करनी होंगी ।
(1) Contact Information
(2) User Information
यह सब information fill करने के बाद आपको “Create an account” पर click करना होगा । जैसे ही आप “Create an account” पर click करते हैं आपका Hostgator पर एक account create हो जाता है ।
Step 8 : आप जैसे ही “Create an account” पर click करते हैं आप एक page पर पहुँच जाते हैं जहां पर आपको आपकी सुविधा के अनुसार “Payment Option” choose करना होता है और “Pay Now” पर click करने से पहले आपको “I Agree to the customer Agreement” पर click करना होता है ।

Step 9 : आप जैसे ही “Payment” successfully कर देते हैं आपका Domain Name आपके Hostgator के “My Account” section मे आ जाएगा ।
नोट : आपको आपका Hostgator account successfully activate करने के लिए जो email ID आपने “Contact Information” भरते समय डाला था उसे varify करना होगा । इसके लिए आपको email ID account open करके Hostgator द्वारा भेजे गए welcome mail को open करके उस mail मे दिये गए link पर click करना होगा । जैसे ही आप उस link पर click करते हैं आप Hostgator की website पर redirect हो जाते हो और आप का Hostgator account activate हो जाता है । इस तरह आप Hostgator Domain Name provider company के साथ Domain Name register कर सकते हैं ।
सार : यदि आप एक website बनाने जा रहे हैं तो सबसे पहले आपको एक domain name की जरूरत होगी और यदि आपको आपकी website के लिए कोई particular Domain Name सही लग रहा है लेकिन उस का .com version available नहीं है तो आप other version लेकर भी website बना सकते हैं । सभी Top Level Domains की उतनी ही value होती है जितनी की .com की होती है ।
उम्मीद है यह article आपको पसंद आया होगा । कैसा लगा आपको यह article हमे बतायें या आप कोई सुझाव देना चाहते हैं या आप हमसे कुछ जानकारी चाहते हैं तो comment box में जरुर लिखें । हमारे blog को अभी तक अगर आपने subscribe नहीं किये हैं तो जल्दी से subscribe कर लें । इसी के साथ जय हिंद, जय भारत, धन्यवाद ।
Contents
- 1. How to Register a Domain Name with HostGator: A Step-by-Step Guide
- 2. HostGator Domain Name Registration: Pricing and Features Overview
- 3. Top Domain Name Extensions Available with HostGator
- 4. HostGator vs GoDaddy: Which Domain Name Registrar is Better?
- 5. HostGator Domain Transfer: How to Move Your Domain Name to HostGator
- 6. HostGator Domain Privacy Protection: Is it Worth the Investment?
- 7. How to Point a Domain Name to HostGator Hosting
- 8. HostGator Subdomain vs Addon Domain: What’s the Difference?
- 9. HostGator Renew Domain: How to Renew Your Domain Name Registration
- 10. HostGator Domain Reseller: How to Become a Domain Name Reseller with HostGator
- Register Domain Name from Hostgator FAQs
1. How to Register a Domain Name with HostGator: A Step-by-Step Guide
If you want to register a domain name with HostGator, you can follow these steps:
- Go to the HostGator website: Visit the HostGator website (www.hostgator.com) and click on the “Domains” tab in the top navigation menu.
- Check the availability of your desired domain name: Enter your desired domain name into the search bar and click “Search.” If the domain name is available, you will see a green checkmark next to it.
- Select your domain extension: Choose your desired domain extension (e.g., .com, .org, .net, etc.) from the drop-down menu.
- Add to cart: Click the “Add to Cart” button to add the domain name to your cart.
- Choose additional options: HostGator offers several additional options, such as domain privacy protection and domain locking. You can choose whether to add these options to your order.
- Review your order: Review your order summary to make sure everything looks correct, and click “Checkout Now” to proceed to the payment page.
- Create a HostGator account: If you don’t already have a HostGator account, you will need to create one by filling out the registration form.
- Enter your payment information: Enter your payment information to complete the purchase. HostGator accepts credit cards and PayPal.
- Confirm your order: After you’ve entered your payment information, review your order one final time to make sure everything is correct, and click “Place Your Order” to confirm your purchase.
Once you’ve registered your domain name with HostGator, you can manage it through the HostGator customer portal. From there, you can set up your website and email addresses, and manage your domain settings.
2. HostGator Domain Name Registration: Pricing and Features Overview
HostGator offers domain name registration services with competitive pricing and features. Here’s an overview of the pricing and features of domain registration with HostGator:
Pricing:
- HostGator offers domain name registration for as low as $12.95 per year for a .com domain. The pricing varies depending on the domain extension you choose.
- HostGator also offers discounts for multi-year registrations. For example, you can register a domain for up to 5 years at a discounted rate.
Features:
- HostGator offers a domain management portal where you can easily manage your domain name settings, DNS, and more.
- HostGator also offers free domain locking and domain privacy protection to keep your domain name secure.
- HostGator’s domain name registration comes with 24/7 customer support via phone, chat, or email.
- HostGator also offers domain transfer services if you need to transfer your domain name from another registrar.
- HostGator provides free domain name system (DNS) management tools that enable you to customize your DNS settings and control how your domain is used.
Overall, HostGator’s domain name registration service offers competitive pricing and a robust set of features, making it a great option for those looking to register a domain name.
3. Top Domain Name Extensions Available with HostGator
HostGator offers a wide range of domain name extensions to choose from. Here are some of the most popular domain name extensions available with HostGator:
- .com – This is the most popular domain name extension and is often used for commercial websites.
- .org – This domain name extension is typically used for non-profit organizations.
- .net – This domain name extension is commonly used for networking and technology-related websites.
- .co – This domain name extension is a great alternative to .com, and is often used by businesses and startups.
- .biz – This domain name extension is often used by businesses that want to focus on their commercial operations.
- .info – This domain name extension is a great choice for websites that provide information and knowledge-sharing.
- .us – This domain name extension is ideal for websites that are geared towards a United States audience.
- .me – This domain name extension is perfect for personal branding and personal websites.
- .online – This domain name extension is great for online businesses and entrepreneurs.
- .store – This domain name extension is ideal for online stores and e-commerce websites.
HostGator offers many other domain name extensions as well, so you’ll be sure to find one that suits your needs.
4. HostGator vs GoDaddy: Which Domain Name Registrar is Better?
HostGator and GoDaddy are two of the most popular domain name registrars in the market. Here are some key factors to consider when comparing the two:
- Pricing: Both HostGator and GoDaddy offer competitive pricing for domain name registration. However, HostGator generally offers slightly lower prices, especially for multi-year registrations.
- Domain Name Extensions: Both registrars offer a wide variety of domain name extensions to choose from. However, HostGator offers more TLDs (Top Level Domains) such as .co.uk, .in, .me, .online, etc., compared to GoDaddy.
- Ease of Use: Both HostGator and GoDaddy offer user-friendly interfaces for managing domain names, DNS settings, and other domain-related tasks. However, some users find HostGator’s interface to be more intuitive.
- Customer Support: Both HostGator and GoDaddy offer 24/7 customer support via phone, chat, and email. However, some users report faster response times and more knowledgeable support agents with HostGator.
- Additional Services: Both registrars offer additional services such as web hosting, website builders, SSL certificates, and more. However, GoDaddy offers a wider range of services and is often considered more of an all-in-one solution.
Based on these factors, both HostGator and GoDaddy are excellent domain name registrars, and the choice ultimately depends on your specific needs and preferences.
5. HostGator Domain Transfer: How to Move Your Domain Name to HostGator
If you have a domain name registered with another registrar and want to transfer it to HostGator, you can follow these steps:
- Check that your domain name is eligible for transfer: Before you initiate a domain transfer, ensure that your domain name is eligible for transfer. This means that your domain name must be at least 60 days old and unlocked, and the domain’s WHOIS information must be accurate and up-to-date.
- Obtain the authorization code: You will need to obtain an authorization code (also known as an EPP code) from your current domain registrar. This code is needed to verify that you are the rightful owner of the domain name.
- Initiate the transfer: Log in to your HostGator account and navigate to the Domain Transfers page. Enter your domain name and authorization code, and follow the on-screen instructions to complete the transfer process.
- Approve the transfer: After you initiate the transfer, your current registrar will send an email to the administrative contact associated with the domain name. You will need to approve the transfer via this email.
- Wait for the transfer to complete: The transfer process can take anywhere from a few hours to several days, depending on your current registrar’s policies. During this time, you should avoid making any changes to your domain name, such as updating its DNS settings.
- Confirm the transfer: Once the transfer is complete, you will receive a confirmation email from HostGator. You can now manage your domain name from your HostGator account.
It’s important to note that there may be fees associated with domain transfers, and these fees can vary depending on the registrar you are transferring from. Be sure to check with your current registrar for more information on transfer fees.
6. HostGator Domain Privacy Protection: Is it Worth the Investment?
HostGator’s domain privacy protection service, also known as WHOIS privacy, is a paid add-on that keeps your personal information, such as your name, email address, and phone number, private and hidden from public view in the WHOIS directory.
Whether or not domain privacy protection is worth the investment depends on your personal preference and situation. Here are some factors to consider:
- Privacy concerns: If you’re concerned about your personal information being publicly available, domain privacy protection can help keep your personal information private and reduce the amount of spam and unsolicited emails you receive.
- Type of website: If you’re running a personal or hobby website, domain privacy protection may not be necessary. However, if you’re running a business website or an e-commerce site that handles sensitive customer information, domain privacy protection may be a worthwhile investment.
- Cost: HostGator’s domain privacy protection service is affordable, but the cost can add up if you have multiple domains. Consider whether the cost of domain privacy protection is worth it for each of your domains.
Overall, if you’re concerned about your personal information being publicly available, or if you’re running a business website or handling sensitive customer information, domain privacy protection can be a worthwhile investment. If you’re running a personal or hobby website, domain privacy protection may not be necessary.
7. How to Point a Domain Name to HostGator Hosting
To point a domain name to HostGator hosting, you need to follow these steps:
- Obtain HostGator’s nameserver information: When you sign up for HostGator hosting, you will receive an email with your account details, including the nameserver information. If you don’t have this information, log in to your HostGator account and navigate to the “Hosting” tab. Click on “Manage Hosting” and then click on “Launch cPanel”. Your nameserver information will be displayed on the left-hand side under “Account Information”.
- Log in to your domain registrar account: Go to the website of your domain registrar, log in to your account, and navigate to the “DNS management” or “Nameservers” section.
- Replace the existing nameservers with HostGator’s nameservers: Delete any existing nameservers and replace them with HostGator’s nameservers that you obtained in step 1. There are typically two or four nameservers, and they will look something like this: ns1.hostgator.com, ns2.hostgator.com, ns3.hostgator.com, and ns4.hostgator.com.
- Save your changes: Save the changes you made to the nameservers and wait for the changes to propagate. This may take up to 48 hours.
Once the changes have propagated, your domain name will be pointed to your HostGator hosting account and your website will be accessible using your domain name.
8. HostGator Subdomain vs Addon Domain: What’s the Difference?
A subdomain and an addon domain are two different ways to add additional websites to your HostGator hosting account.
A subdomain is a domain that is part of your main domain, and it is used to create different sections of your website. For example, if your main domain is “example.com,” you can create a subdomain called “blog.example.com” to host your blog. Subdomains are created through your hosting control panel, and they do not require a separate domain name registration.
On the other hand, an addon domain is a completely separate domain name that is hosted on your HostGator account. It has its own website files, email accounts, and other settings.
You need to register an addon domain separately and link it to your hosting account through the control panel. You can host multiple addon domains on a single HostGator account, and they are treated as separate websites with their own unique content.
In summary, a subdomain is a part of your main domain and is used to create different sections of your website, while an addon domain is a separate domain name that is hosted on your HostGator account and has its own website files and settings.
9. HostGator Renew Domain: How to Renew Your Domain Name Registration
To renew your domain name registration with HostGator, follow these steps:
- Log in to your HostGator customer portal.
- Go to the “Domains” section and select “My Domains.”
- Find the domain you want to renew and click the “Renew” button next to it.
- Select the renewal length you want, and then click “Checkout.”
- Review your order and then click “Complete Order” to proceed with the payment.
Once your payment is processed, your domain name registration will be renewed for the selected duration. It is important to renew your domain name registration before it expires to avoid any interruption in your website’s operation or losing the domain to someone else who might register it after its expiration.
10. HostGator Domain Reseller: How to Become a Domain Name Reseller with HostGator
HostGator offers a domain reseller program that allows you to sell domain names to your customers as a part of your own business. Here are the steps to become a domain name reseller with HostGator:
- Sign up for a HostGator reseller hosting account. This will provide you with the necessary tools and resources to become a domain reseller.
- Log in to your HostGator customer portal and go to the “Domains” section.
- Click on “Domain Reseller” and then click “Activate.”
- Follow the instructions to complete your domain reseller account setup.
- Once your account is set up, you can start selling domain names to your customers through your own website or storefront.
As a HostGator domain reseller, you will have access to a wide range of TLDs (Top-Level Domains) such as .com, .net, .org, and many more, at wholesale prices. You can set your own prices and sell domain names to your customers under your own brand. HostGator provides a range of tools and resources to help you manage your domain reselling business, including a customizable storefront, billing and invoicing tools, and customer management features.
Register Domain Name from Hostgator FAQs
HostGator is a popular web hosting provider that offers a variety of web hosting services, including shared hosting, VPS hosting, dedicated servers, and domain registration services.
To register a domain name with HostGator, you need to visit the HostGator website and click on the 'Domains' tab. From there, you can search for the availability of the domain name you want to register and select a domain extension (.com, .net, .org, etc.). Once you have chosen your domain name and extension, you will need to follow the instructions to complete the registration process.
The cost of registering a domain name with HostGator varies depending on the domain extension and the duration of the registration. Generally, the cost of a domain name starts from around $12 per year for popular extensions like .com, .net, and .org.
When you register a domain name with HostGator, you will get access to features like domain privacy protection, domain locking, DNS management, and email forwarding. These features can help protect your domain name and make it easier to manage.
Yes, you can transfer your domain name to HostGator from another registrar. HostGator offers domain transfer services that allow you to transfer your domain name and manage it from your HostGator account. You will need to follow the instructions provided by HostGator to complete the transfer process. What is HostGator?
How do I register a domain name with HostGator?
How much does it cost to register a domain name with HostGator?
What features are included when I register a domain name with HostGator?
Can I transfer my domain name to HostGator from another registrar?
| Web Hosting | Website |
| WordPress | Google Adsense |
| SEO | Affiliate Marketing |
| Blogging | YouTube |
Recent Posts
- 5 Best WordPress Hosting Provider in Somalia 2023
- 5 Best WordPress Hosting Provider in Austria 2023
- 5 Best WordPress Hosting Provider in Luxembourg 2023
- 5 Best WordPress Hosting Provider in Switzerland 2023
Related Tags
GoDaddy, HostGator domain name, HostGator domain name search, HostGator login, HostGator buy domain, Domain name search, HostGator hosting plans, HostGator domain price


